🚧 We're Open - Trafalgar Rd. Construction Alert
Trafalgar Rd. is one lane 9 AM-3 PM (Mon-Fri) until June 6, 2025.
Please enter via Postridge Dr. south entrance to avoid delays.
See Best Route to EQ Physio
Osteoarthritis sufferers – find relief with physiotherapy
Concerns about side effects of taking non-steroidal anti-inflammatory medications has left many osteoarthritis sufferers wondering how to manage their pain and disability. Many answers may be found in the Ottawa Panel Guidelines for Therapeutic Exercises and Manual Therapy in the Management of Osteoarthritis. The expert panel developed 13 grade-A recommendations for therapeutic exercise procedures in the management of osteoarthritis. A combination of manual therapy (hands-on techniques) and exercise also resulted in improved pain and longer walking distance in one randomized controlled trial on knee osteoarthritis.
Also, the results of a randomly controlled study on hip osteoarthritis suggested that manual therapy and stretching are more beneficial than an exercise program alone for improving pain, function, and walking speed in someone suffering with hip osteoarthritis.
Physiotherapists have been aware of this information for years, and now the most recent clinical guidelines support the use of exercise and manual therapy as part of an effective treatment program for osteoarthritis.
If you or someone you know is suffering from pain associated with osteoarthritis, we highly recommend that you contact us to book an assessment with our physiotherapist.
We can provide interventions to help decrease your pain and improve your level of function. Our clinic is conveniently located at the corner of Dundas and Trafalgar in Oakville.
Confused about whether to put a hot pack or ice on that injury? You’re not alone – this is a commonly asked question. Cold and heat both have their place in the rehabilitation process. When used correctly, each can help to reduce pain and control swelling and assist with tissue healing. When used inappropriately, they may delay healing. So how do you know which to use?
Cold Therapy
This includes freezer gel packs, ice cubes or an ice bath. Cold can be applied in the first 24-48 hours after injury (during the “acute” phase). Cold causes constriction of blood vessels which will limit the amount of swelling that develops. It also slows nerve conduction and decreases skin temperature which will reduce pain. Cold can also be used after the first 48 hours if inflammation continues or after exercise to help with soreness. Wrap the cold pack in a damp towel to prevent frostbite on the skin and apply to the injured area for 10-15 minutes.
Heat Therapy
This includes hot water bottles, electric heating pads or moist heat packs. Heat causes dilation of the blood vessels which increases blood flow to the area. This assists with removal of waste products and delivery of oxygen and nutrients to promote healing. Wrap the heat pack in a few layers of towel to prevent burns and apply to the affected area for 15-20 minutes. Do not lie on the hot pack or apply when going to sleep as this increases the risk of burns.
Although the use of heat is commonly applied for ‘chronic’ issues, heat can also be used early in the recovery process to help reduce pain, improve muscle tension and swelling. In fact, the use of heat is preferred where you want to promote blood flow and circulation. However, avoid applying heat on areas that are inflamed (warm to the touch, increased redness and obvious swelling).
While cold and heat can both be beneficial, they should not be used, or used with caution if you have:
• Impaired circulation
• Reduced skin sensation
• Hypersensitivity or allergic reactions to cold
• Open or infected wounds, or acute dermatitis or eczema
• Malignant tumours or active tuberculosis lesions
If you have questions about whether to use hot or cold, or if you are unsure about the nature and severity of your injury, get in touch to book an appointment with our physiotherapist. Our clinic is conveniently located at Dundas and Trafalgar in Oakville.
Michelle Strong, Registered Holistic Nutritionist, is one of our community partners and is our guest author this week. She is the founder of the Strong Nutrition and Weight Loss clinic (www.strongnutritionandweighttloss.com)– a boutique nutrition practice for weight loss and prevention/ management of chronic illness. Her approach is integrative and addresses the emotional connections people have with food instead of the simplistic and outdated calorie-in vs. calorie-out mentality.
‘Tis the season, New Year’s Resolutions are (hopefully) full speed ahead and with that come the inevitable slew of injuries associated with post holiday indulgences. So whether you fall into this group, the weekend warriors or you slug it out with your driveway each snow day, follow this advice to reduce inflammation ASAP and start feeling like your old self.
Inflammation is an immune reaction in response to infections, wounds or any type of physical damage to tissue. If you turn over your ankle shoveling the driveway, often you will feel heat and swelling in the area. This is acute inflammation and is necessary to the healing process. Alternatively, chronic inflammation is a long term reaction in the body; this does not serve the body in the healing process, and in fact in creates more damage the longer it lasts.
Although different, both acute and chronic inflammation benefit from similar nutritional recommendations to improve recovery and healing.
Take it Out: Don’t add fuel to the fire. Think about inflammation as heat or fire in the body. Would you add gas to an uncontrollable fire? Nope, so we don’t do this in the body either. Think about sugar as gas. This “food” triggers the release of inflammatory messengers called cytokines which just makes everything worse off.
There are so many types of sugars out there to beware of, but for simplicity, stay away from processed white sugars (fruit is ok). Avoid (like the plague) things like candy, alcohol (sorry), white breads, crackers and pastas and foods that have added sugars like flavoured yogurt and cereals.
Add it In: There are so many healing foods out there and generally, we ALL know what is good for us and what isn’t. However, there are some KEY antioxidant rich beauties that can speed up healing time. My 3 favourite are: Turmeric (also ginger and cayenne and black pepper), plant based fats (coconut oil, olive oil and avocado) and Fermented Foods (kimchi, sauerkraut, kefir).
Often I will pass along this recipe and have client drink it daily (if not daily, at least during their recovery time). This is tasty and perfect for these chilly Canadian mornings.
Turmeric Tea Recipe (How to Make Golden Milk)
Prep: 2 mins / Cook: 3 mins / Total: 5 mins / Yield: 4
Turmeric tea (also called golden milk) is a great way to get the benefits of turmeric daily. Find out how to make this ancient health-boosting drink in under 5 minutes!
Ingredients
2 cups of milk of choice (almond, pecan, coconut, and dairy all work in this recipe) or use bone broth in place of the milk for a more hearty tea
First, blend all ingredients in a high-speed blender until smooth.
Then, pour into a small saucepan and heat for 3-5 minutes over medium heat until hot but not boiling.
Drink immediately.
Source: wellnessmamma.com
Slather it on top: In conjunction with the above, there are also topical options.
Topical use of turmeric mixed with an oil like coconut oil (watch out this stains!)
Essential Oils: there are multiple options out there; I like Deep Blue and Frankincense (by DoTerra), these I find are the best to ward off pain caused by inflammation. These can be used along with coconut oil and massaged into the sore area.
Epsom Salts. Soak the injured area in a warm bath of salts (and with the oils listed above).
For more information on inflammation including a tasty inflammatory busting smoothie recipe, click here: Enjoy!
Posture is something we all intuitively know something about, and ideal posture is something we all strive for.
But how much do you really understand about what your ideal posture is?
Imagine if you were looking at yourself from the side and could draw a line from the top of your head down to the floor. With ideal posture, that line would pass down through the ear canal, over the tip of the shoulder, just in front of the middle back vertebrae, through the middle of the low back vertebrae, right over the pointy bone of the hip, through the middle of the knee and outer bone of the ankle.
Some people have increased curves and their head is forward. This puts excessive stress on the neck muscles and can cause pain.
Others have too large of a curve in the middle and or lower back, which can also cause unusual stress on the middle and lower back.
Finally, seniors may have a forward bent or kyphotic middle back. Often the bones become wedge-shaped making it impossible to stand up straight.
Our therapists can help you with the pains and muscle tightness associated with poor posture, and help you work toward achieving ideal posture through muscle strengthening, as well as increasing range of motion and flexibility.
If you or someone you know is having trouble with neck pain, lower back pain, or poor posture, have them contact us. EQ Physio is conveniently located at the corner of Dundas and Trafalgar in Oakville – we’re here to help you achieve balance and equilibrium today!
Have you ever suffered from knee pain around or under your kneecap (patella)? This may be related to a condition called patellofemoral syndrome.
Treatment for this type of knee pain includes exercises to improve the strength of your front thigh muscles (quadriceps). You may have also even had your knee taped, braced or stimulated.
However, if you haven’t done anything to strengthen your hip muscles, you are missing out!
A recent research study (1) reviewed the best available research on the best exercises for patellofemoral syndrome. It found that a combination of hip and knee strengthening will reduce your pain and help you return to your usual level of activity.
Specifically, exercises to strengthen your thigh (quadriceps), and hip (abductors, lateral rotators, and extensors) muscles were found to be better than knee exercises alone. A strong and more stable hip is thought to reduce the stress at the knee.
The evidence also suggested that they should be done 3x/week for at least 6 weeks, even if you had moderate-to-severe pain for at least three months.
Some of the exercises used in the study include the following (3 sets of 10):
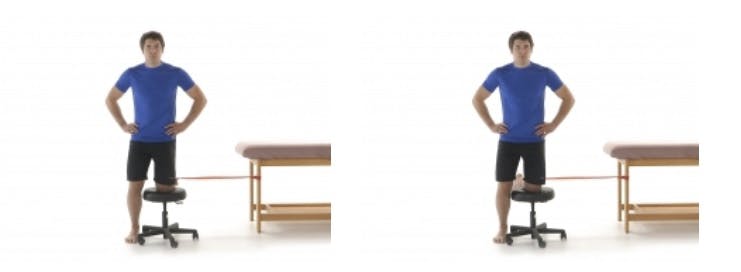
Hip External Rotation
Attach one extremity of an elastic band around your ankle and attach the other extremity to a solid object on your side.
In standing, put your knee on a stool and position yourself so you will be pulling your foot towards the inside to externally rotate your hip.
Only your hip should rotate, your body should stay perfectly still and straight.
Hip internal rotation
Attach one extremity of an elastic band around your ankle and attach the other extremity to a solid object on your side.
In standing, put your knee on a stool and position yourself so you will be pulling your foot towards the outside to internally rotate your hip.
Only your hip should rotate, your body should stay perfectly still and straight.
Sidelying leg raises (Hip abduction)
Lie on your side against a wall with your bottom leg bent in front.
Lift up your top leg on the wall, keeping it straight, and your pelvis stable.
Once you reach the maximum range without any movement of your pelvis, externally rotate your hip so that your foot is pointing upwards. Rotate your leg back before returning to the initial position and repeat.
These are “Level 1” type exercises. If you would like more information about your knee pain or how to progress your exercises, please don’t hesitate to contact us!
Nascimento et al, titled “Hip and Knee Strengthening Is More Effective Than Knee Strengthening Alone for Reducing Pain and Improving Activity in Individuals With Patellofemoral Pain: A Systematic Review With Meta-analysis” (J Orthop Sports Phys Ther 2018;48(1):19-31. doi:10.2519/jospt.2018.7365).
Gabe Ho, Registered Massage Therapist is a graduate of the Royal Canadian College of Massage, McMaster Contemporary Medical Acupuncture, and McMaster Advanced Neurofunctional Sports Performance Programs and a member of the College of Massage Therapists. He uses a neurofunctional approach for his massage and acupuncture treatments to identify and correct the underlying causes of dysfunction.
What is the true cause of your heel pain?
Plantar fasciitis is a commonly diagnosed condition for heel pain that results from inflammation of the plantar fascia.
Symptoms typically include:
A sharp burning pain when pressure is applied to the bottom of the foot – often described as ‘like stepping on glass’
More prevalent in the morning or after prolonged walking or standing
This pain can be very limiting and difficult to treat.
Does this sound like your heel pain?
Unfortunately more often than not plantar fasciitis is used as an umbrella diagnosis for heel pain.
The plantar fascia is a very strong connective tissue that wraps from your heel to the base of your toes. It has to be extremely strong and durable to be able to manage the weight bearing forces of not just standing but exponentially increased forces such as running or jumping.
It is unlikely that you are going to wake up one day and find that this connective tissue, that is built to withstand tremendous forces, has become so brittle that you can’t put your body weight on it.
Commonly, we find that heel pain is due to an irritation of one or more of the following nerves in the foot:
Tibial, with its medial and lateral plantar branches
Saphenous
Sural
These irritated nerves can be traced up the leg and often into the back. The irritation can be a result of a seemingly unrelated injury, a mal-alignment of structures (such as bones in the foot), hip or knee dysfunction, or issues of the spine.
An effective treatment of heel pain locates the source of the irritation (foot, knee, hip, back) through a detailed physical examination. This ensures that we can treat the source of your heel pain as well as calming the local irritation in the foot.
If you are looking to understand your heel pain, our registered massage therapist or physiotherapist can provide you with the appropriate guidance to help you return to your regular activities.
Still unsure? Come and see one of our expert therapists at EQ Physio for a free 10-minute consultation to discuss how we can help you. Our clinic is conveniently located near the corner of Dundas and Trafalgar in Oakville.